
Problem Statement(MLOps Task 4): Create a project using transfer learning solving various problems like Face Recognition, Image Classification, using existing Deep Learning models like VGG16, VGG19, ResNet, etc.
First we must know “What is Transfered Learning?”
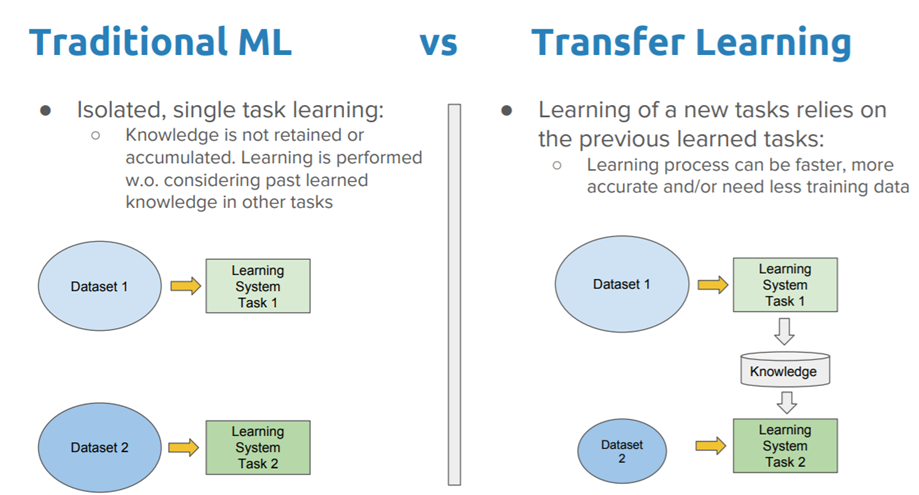
Transfer learning is a machine learning method where a model developed for a task is reused as the starting point for a model on a second task.
“Transfer learning and domain adaptation refer to the situation where what has been learned in one setting … is exploited to improve generalization in another setting”
So now lets get started…
First we have to decide which model we are going to used for transfered learning. Since we are going to make Facial Recognition, one of the Best pre-trained model is VGG16 which was trained on imagenet dataset.
We can use keras to load the VGG16 pre-trained model. By default if we load the model we will get the whole model but we do not need the last layer since we are going to make our own layer which will output according to our data set.So will drop the last layer while loading the model. Also since the VGG16 only takes input shape of 244x244, will define it while loading.

from keras.applications import VGG16

# VGG16 was designed to work on 224 x 224 pixel input images sizes
img_rows = 224
img_cols = 224

#Loads the VGG16 model
model = VGG16(weights = 'imagenet',
                 include_top = False,
                 input_shape = (img_rows, img_cols, 3))
Lets print out the layers will their status wheather they can bee trainable or not.
for (i,layer) in enumerate(model.layers):
    print(str(i) + " " + layer.__class__.__name__ + "\t" ,layer.trainable)
As you can see all the layers of model are trainable except Input Layer, but we dont want to lose the weights that they have. We dont require to change them, so we will make them untrainable(trainable=False).
for layer in model.layers:
    layer.trainable = False
# Let's print our layers
for (i,layer) in enumerate(model.layers):
    print(str(i) + " " + layer.__class__.__name__ + "\t" ,layer.trainable)
Now all the layers have been freezed and we can add a new layer which will be trained on our dataset.
Lets create a function which will add an extra layer which will hold the weights of new dataset and the last layer /output layer which will output the result. We will pass the original model (bottom_model )with no of output/classes (num_classes) and no of neurons (by default D=256) which we want in Dense layer.
def addTopModel(bottom_model, num_classes, D=256):
    """creates the top or head of the model that will be
    placed ontop of the bottom layers"""
    top_model = bottom_model.output
    top_model = Flatten(name = "flatten")(top_model)
    top_model = Dense(D, activation = "relu")(top_model)
    top_model = Dropout(0.3)(top_model)
    top_model = Dense(num_classes, activation = "softmax")(top_model)
    return top_model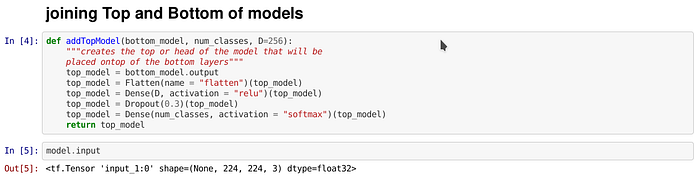
Lets import the necessary libraries and make our new model using the function we created.
from keras.models import Sequential
from keras.layers import Dense, Dropout, Activation, Flatten
from keras.layers import Conv2D, MaxPooling2D, ZeroPadding2D
from keras.layers.normalization import BatchNormalization
from keras.models import Model

num_classes = 3
FC_Head = addTopModel(model, num_classes)
modelnew = Model(inputs=model.input, outputs=FC_Head)
Now lets see our new model using model.summary()
print(modelnew.summary())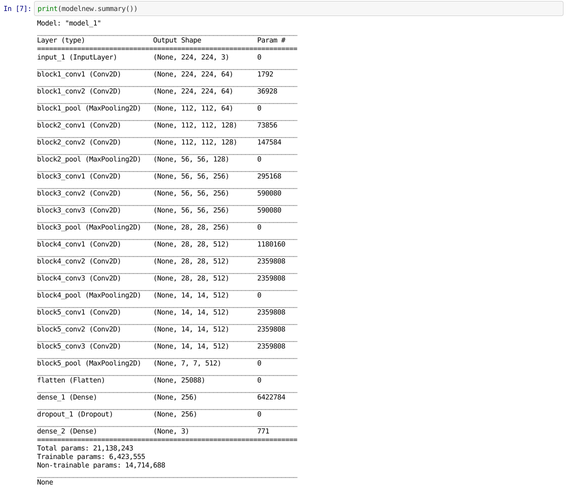
Now lets import our dataset and do some pre-processing, for that we can use keras → ImageGenerator which will load our dataset and also resize them according to the VGG16 input shape. I have created to folders one for training and other for testing. I am going to load both the data set with keras.
I have also done augmentation by my own. I have created a script for that which you can find in the GitHub link (augmentation.py)
from keras.preprocessing.image import ImageDataGeneratortrdata = ImageDataGenerator()
traindata = trdata.flow_from_directory(directory="/root/mlopsproject/UntitledFolder/Traning2/",target_size=(224,224))
tsdata = ImageDataGenerator()
testdata = tsdata.flow_from_directory(directory="/root/mlopsproject/UntitledFolder/Validation2/", target_size=(224,224))

Now lets import Optimizer to train our model and some Callbacks which will help train the model efficiently.
from keras.optimizers import RMSprop
from keras.callbacks import ModelCheckpoint, EarlyStoppingcheckpoint = ModelCheckpoint("friends_vgg.h5",
                             monitor="val_loss",
                             mode="min",
                             save_best_only = True,
                             verbose=1)

earlystop = EarlyStopping(monitor = 'val_loss',
                          min_delta = 0,
                          patience = 4,
                          verbose = 1,
                          restore_best_weights = False)

# we put our call backs into a callback list
callbacks = [earlystop, checkpoint]
There are two call backs one to save the best model and other to stop training if no progress is seen in metrics of ‘val_loss’.
We make an list consisting of both the callbacks to pass while training the model.
Now lets Compile the Model which we will be giving our dataset to train.
modelnew.compile(loss = 'categorical_crossentropy',
              optimizer = RMSprop(lr = 0.001),
              metrics = ['accuracy'])
Lets define some variables which we will pass while training on dataset.
nb_train_samples = 916
nb_validation_samples = 106
epochs = 6
batch_size = 8
Now lets train our model and save it.
history = modelnew.fit_generator(
    traindata,
    steps_per_epoch = nb_validation_samples // batch_size,
    epochs = epochs,
    callbacks = callbacks,
    validation_data = testdata,
    validation_steps = nb_validation_samples // batch_size
)

modelnew.save("friends_vgg16f.h5")

As you can see after training the accuracy reached at final is about 0.73.
Now lets test our model
Output of the model will be numerical (0,1,2) but we dont know which output is for which image-set/class. So first print classes index from taindata
traindata.class_indices
As you can see it outputs dictionary for classes with index number.
To show our images I am also using CV2 module and adding some pre-prosessing steps to input it into our model.
I am taking random Images from Testing dataset
import os
import cv2
import numpy as np
from os import listdir
from os.path import isfile, join


singers_dict = {
    0:'Akshansh',
    1:'Aman',
    2:'Ritesh',
}


def draw_test(name, pred, im):
    singer = singers_dict[pred]
    BLACK = [0,0,0]
    expanded_image = cv2.copyMakeBorder(im, 80, 0, 0, 100 ,cv2.BORDER_CONSTANT,value=BLACK)
    cv2.putText(expanded_image, singer, (20, 60) , cv2.FONT_HERSHEY_SIMPLEX,1, (0,0,255), 2)
    cv2.imshow(name, expanded_image)

def getRandomImage(path):
    """function loads a random images from a random folder in our test path """
    folders = list(filter(lambda x: os.path.isdir(os.path.join(path, x)), os.listdir(path)))
    random_directory = np.random.randint(0,len(folders))
    path_class = folders[random_directory]
    print("Class - " + path_class)
    file_path = path + path_class
    file_names = [f for f in listdir(file_path) if isfile(join(file_path, f))]
    random_file_index = np.random.randint(0,len(file_names))
    image_name = file_names[random_file_index]
    return cv2.imread(file_path+"/"+image_name)

for i in range(0,20):
    input_im = getRandomImage("/root/mlopsproject/UntitledFolder/Testing2/")
    input_original = input_im.copy()
    input_original = cv2.resize(input_original, None, fx=0.5, fy=0.5, interpolation = cv2.INTER_LINEAR)

    input_im = cv2.resize(input_im, (224, 224), interpolation = cv2.INTER_LINEAR)
    input_im = input_im / 255.
    input_im = input_im.reshape(1,224,224,3)

    # Get Prediction
    res = np.argmax(modelnew.predict(input_im))

    # Show image with predicted class
    draw_test("Prediction", res, input_original)
    cv2.waitKey(0)

cv2.destroyAllWindows()
Here are some samples images :-


